If you’re wondering how to enable iMessage, you’re not alone. Many Apple users buy a new iPhone, switch devices, or update their settings and suddenly discover that iMessage isn’t working. Without iMessage enabled, your messages may be sent as regular SMS texts instead of Apple’s free messaging service.
The good news is that enabling iMessage is usually quick and easy. Whether you’re using an iPhone, iPad, or Mac, this guide will show you exactly how to turn on iMessage, troubleshoot activation issues, and get the most out of Apple’s messaging platform.
This comprehensive guide covers everything from basic setup to advanced troubleshooting, making it one of the most complete resources available for anyone searching for how to enable iMessage.
What Is iMessage and Why Should You Enable It?
- iMessage is Apple’s built-in messaging service.
- It works on iPhone, iPad, and Mac devices.
- Messages are sent through the internet.
- iMessage supports photos and videos.
- Users can send voice messages.
- Read receipts are available.
- Typing indicators appear in conversations.
- Messages sync across Apple devices.
- Group chats are easier to manage.
- End-to-end encryption improves privacy.
- No SMS charges for iMessage chats.
- High-quality media sharing is supported.
- Users can share locations instantly.
- Message reactions are available.
- Stickers and effects enhance conversations.
- Messages can be edited in supported versions.
- Deleted messages can be recovered temporarily.
- Works with Wi-Fi connections.
- Integrates with Apple ecosystem features.
- Provides a smoother messaging experience.
Requirements Before Enabling iMessage
- You need an Apple ID.
- Internet access is required.
- Wi-Fi or mobile data must be active.
- Your device should support iMessage.
- Apple servers must be operational.
- Date and time settings should be correct.
- SIM card should be properly installed.
- Mobile number must be active.
- Latest iOS version is recommended.
- Apple ID credentials should be available.
- Device activation should be complete.
- Carrier settings should be updated.
- Network restrictions should be disabled.
- Messages app should be functioning normally.
- Apple ID verification may be required.
- International SMS activation may occur.
- Device storage should have free space.
- Screen Time restrictions should allow messaging.
- VPN settings should not interfere.
- Region settings should be configured correctly.
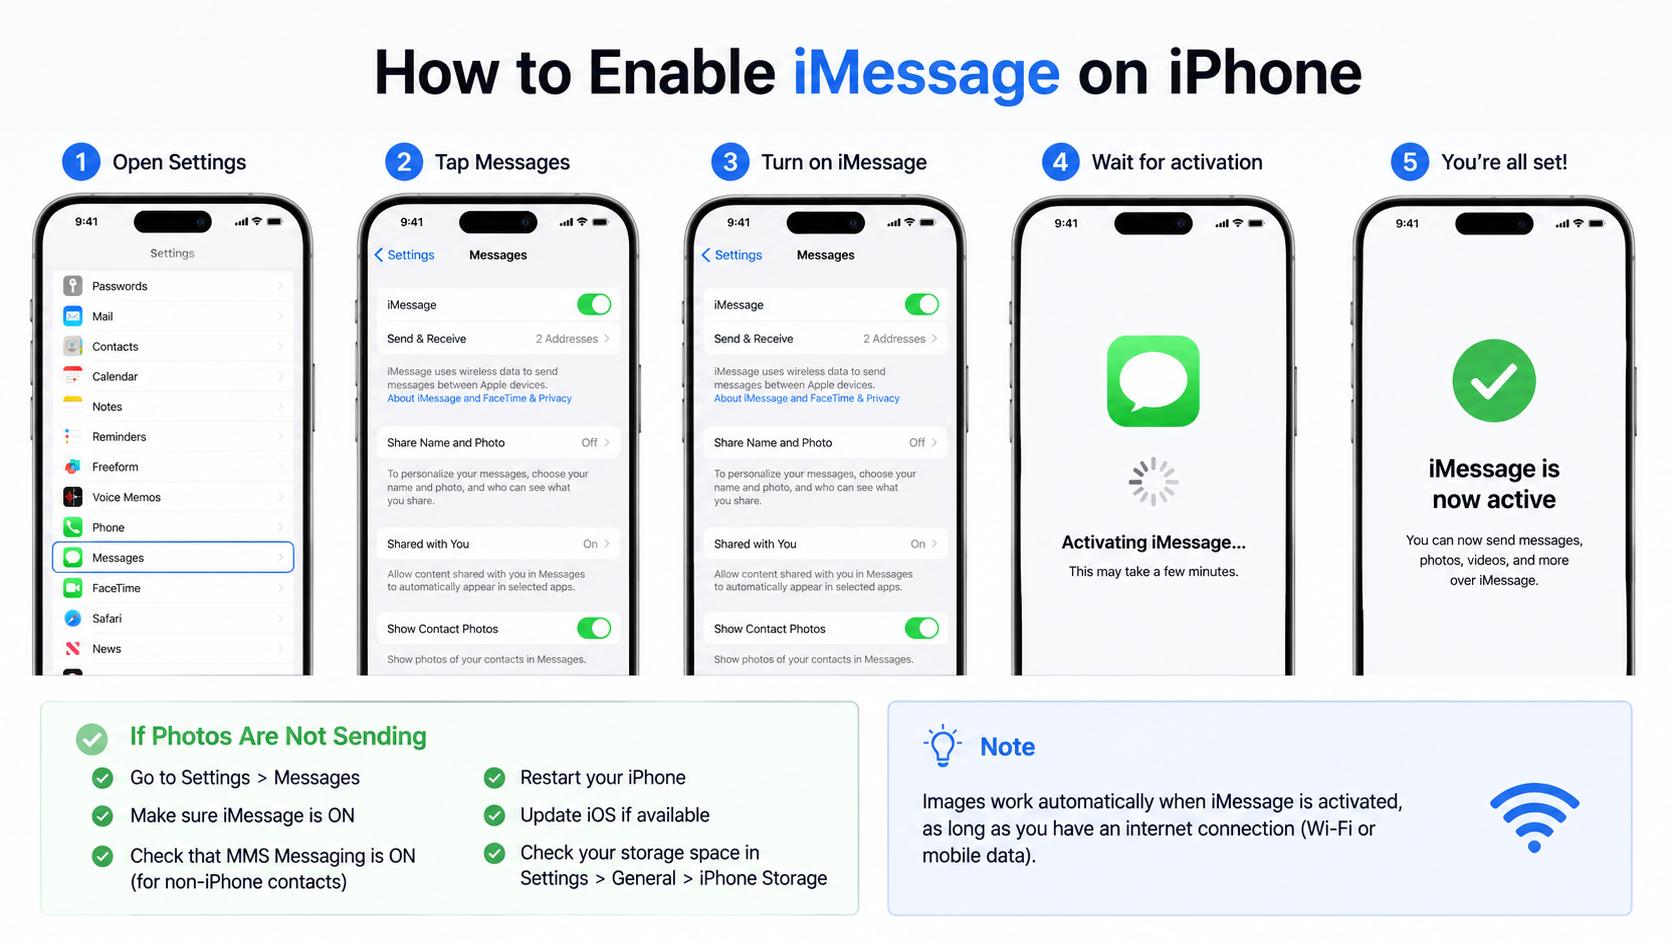
How to Enable iMessage on iPhone
- Open the Settings app.
- Scroll down and tap Messages.
- Locate the iMessage option.
- Toggle iMessage to ON.
- Wait for activation to begin.
- Sign in with your Apple ID if prompted.
- Verify your phone number.
- Ensure Wi-Fi is connected.
- Check activation status.
- Wait several minutes if necessary.
- Restart the device if activation stalls.
- Verify date and time settings.
- Confirm carrier network connection.
- Open Messages app afterward.
- Start a new conversation.
- Look for blue message bubbles.
- Send a test message.
- Check delivery confirmation.
- Confirm contacts also use Apple devices.
- Enjoy iMessage features.
How to Enable iMessage on iPad
- Open Settings on the iPad.
- Tap Messages in the sidebar.
- Enable the iMessage switch.
- Sign into your Apple ID.
- Verify account credentials.
- Connect to a stable internet connection.
- Wait for activation.
- Open Messages application.
- Sync contacts if needed.
- Enable message forwarding.
- Configure Send & Receive settings.
- Select preferred email addresses.
- Check conversation synchronization.
- Restart iPad if needed.
- Update iPadOS if outdated.
- Verify Apple ID login status.
- Test by sending a message.
- Confirm blue message bubbles appear.
- Ensure notifications are enabled.
- Enjoy messaging across Apple devices.
How to Enable iMessage on Mac
- Open the Messages app.
- Click Messages in the menu bar.
- Select Settings or Preferences.
- Click the iMessage tab.
- Sign into your Apple ID.
- Enable your account.
- Choose Send & Receive options.
- Select preferred email addresses.
- Sync contacts automatically.
- Enable message notifications.
- Verify internet connection.
- Wait for account activation.
- Restart Messages app if needed.
- Update macOS if required.
- Test sending a message.
- Confirm synchronization with iPhone.
- Enable message history syncing.
- Configure notification preferences.
- Verify security settings.
- Enjoy iMessage on Mac.
How to Check If iMessage Is Enabled
- Open Settings on your device.
- Navigate to Messages.
- Verify iMessage switch is green.
- Open Messages app.
- Start a conversation.
- Type a contact name.
- Check message box color.
- Blue bubbles indicate iMessage.
- Green bubbles indicate SMS.
- View Send & Receive settings.
- Confirm Apple ID connection.
- Check phone number verification.
- Send a test message.
- Review message delivery status.
- Confirm synchronization across devices.
- Check internet connection.
- Verify activation completion.
- Review Apple ID account status.
- Ensure no activation warnings appear.
- Confirm messages send successfully.
Common Reasons iMessage Won’t Activate
- Weak internet connection.
- Incorrect Apple ID credentials.
- Outdated iOS software.
- Carrier network issues.
- Incorrect date and time settings.
- Apple server outages.
- SIM card problems.
- VPN conflicts.
- Network restrictions.
- Apple ID verification issues.
- Message settings corruption.
- Activation delays.
- Region configuration problems.
- Temporary Apple service interruptions.
- Device software glitches.
- Carrier activation limitations.
- Security restrictions.
- Mobile data disabled.
- Incomplete device setup.
- Temporary server congestion.
How to Fix iMessage Activation Problems
- Restart your iPhone.
- Check internet connectivity.
- Toggle iMessage off and on.
- Sign out of Apple ID.
- Sign back into Apple ID.
- Update iOS software.
- Check Apple system status.
- Verify phone number settings.
- Reset network settings.
- Enable mobile data.
- Reinsert SIM card.
- Turn Airplane Mode on briefly.
- Correct date and time settings.
- Disable VPN services.
- Contact your carrier.
- Wait up to 24 hours.
- Restart Messages app.
- Update carrier settings.
- Check Screen Time restrictions.
- Contact Apple Support if necessary.
Benefits of Using iMessage
- Free messaging through internet.
- Better privacy protection.
- Secure end-to-end encryption.
- High-quality photo sharing.
- High-quality video sharing.
- Group chat support.
- Cross-device synchronization.
- Read receipt functionality.
- Typing indicators.
- Fun message effects.
- Easy file sharing.
- Voice message support.
- Sticker integration.
- Apple Pay compatibility.
- Location sharing features.
- Message editing capability.
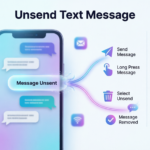
- Message unsending options.
- Smooth Apple ecosystem integration.
- Reliable communication platform.
- Enhanced user experience.
How to Enable iMessage Features
- Turn on read receipts.
- Enable message effects.
- Activate message synchronization.
- Configure message forwarding.
- Turn on location sharing.
- Enable notification previews.
- Set custom message alerts.
- Activate contact photos.
- Configure focus mode settings.
- Enable voice message retention.
- Turn on shared content features.
- Enable Apple Cash messaging.
- Configure group messaging options.
- Activate message filtering.
- Enable Siri message suggestions.
- Turn on message reactions.
- Configure notification badges.
- Enable message search indexing.
- Activate shared media access.
- Customize messaging preferences.
How to Enable iMessage After Switching Phones
- Insert active SIM card.
- Connect to internet.
- Sign into Apple ID.
- Open Messages settings.
- Enable iMessage.
- Verify phone number.
- Wait for activation.
- Restore previous backups.
- Sync contacts.
- Update carrier settings.
- Confirm message forwarding.
- Check Send & Receive options.
- Sign out from old devices.
- Verify account security.
- Restart new device.
- Test messaging functionality.
- Confirm synchronization.
- Review notification settings.
- Check activation completion.
- Enjoy uninterrupted messaging.
Best Tips for Using iMessage
- Keep software updated.
- Use strong Apple ID security.
- Enable two-factor authentication.
- Regularly back up devices.
- Use Wi-Fi when available.
- Organize conversations.
- Enable message syncing.
- Manage storage space.
- Delete unnecessary attachments.
- Use Focus modes effectively.
- Keep contacts updated.
- Customize notifications.
- Protect account credentials.
- Use secure internet connections.
- Review privacy settings regularly.
- Archive important conversations.
- Monitor device storage.
- Enable Find My iPhone.
- Explore advanced messaging features.
- Stay updated on new iMessage tools.
Troubleshooting Advanced iMessage Issues
- Reset network settings completely.
- Update carrier configuration.
- Verify Apple server availability.
- Remove conflicting VPN profiles.
- Re-authenticate Apple ID.
- Check device restrictions.
- Inspect Screen Time controls.
- Reinstall system updates.
- Reset Messages settings.
- Verify SIM functionality.
- Review DNS settings.
- Test alternative networks.
- Check account security alerts.
- Sign out from all Apple devices.
- Reactivate iMessage services.
- Remove duplicate device registrations.
- Clear software conflicts.
- Verify regional settings.
- Contact Apple technical support.
- Perform full device restart.
How to Enable iMessage with Your Phone Number
- Open the Settings app.
- Tap Messages.
- Turn on iMessage.
- Wait for activation.
- Tap Send & Receive.
- Check your phone number.
- Select your number for sending messages.
- Verify the number is active.
- Connect to Wi-Fi.
- Enable mobile data if needed.
- Restart your device if verification fails.
- Update carrier settings.
- Make sure the SIM card is inserted correctly.
- Verify your Apple ID.
- Remove old inactive numbers.
- Check regional settings.
- Wait for activation confirmation.
- Send a test message.
- Confirm blue message bubbles appear.
- Enjoy messaging with your phone number.
How to Enable iMessage Using Your Apple ID
- Open Settings.
- Tap Messages.
- Enable iMessage.
- Select Send & Receive.
- Tap Use Your Apple ID.
- Enter Apple ID credentials.
- Complete sign-in verification.
- Connect to the internet.
- Wait for activation.
- Confirm your email address.
- Select sending preferences.
- Sync contacts automatically.
- Verify account information.
- Enable iCloud if desired.
- Test message delivery.
- Restart Messages if necessary.
- Check notification settings.
- Keep Apple ID secure.
- Enable two-factor authentication.
- Start using iMessage across devices.
How to Enable iMessage Sync Across Apple Devices
- Sign in using the same Apple ID.
- Enable iMessage on iPhone.
- Enable iMessage on iPad.
- Enable iMessage on Mac.
- Open Send & Receive settings.
- Select matching email addresses.
- Turn on iCloud Messages.
- Connect all devices to the internet.
- Verify account synchronization.
- Enable message forwarding.
- Check notification preferences.
- Test message delivery.
- Restart devices if syncing fails.
- Update software versions.
- Keep devices connected regularly.
- Review Apple ID settings.
- Enable cloud backups.
- Monitor synchronization status.
- Verify conversations appear everywhere.
- Enjoy seamless messaging access.
Security and Privacy Features of iMessage
- End-to-end encryption protects conversations.
- Messages stay private between users.
- Apple cannot read encrypted messages.
- Face ID secures device access.
- Touch ID adds protection.
- Two-factor authentication improves account security.
- Messages can be deleted.
- Spam contacts can be blocked.
- Unknown senders can be filtered.
- Shared content remains secure.
- Location sharing is optional.
- Secure backups protect conversations.
- Apple ID security helps prevent breaches.
- Device passcodes add another layer.
- Private photos stay protected.
- Message editing improves accuracy.
- Message unsending adds flexibility.
- Security updates strengthen protection.
- Account alerts notify suspicious activity.
- Privacy remains a core iMessage feature.
Common iMessage Settings You Should Customize
- Turn read receipts on or off.
- Configure message forwarding.
- Enable notification previews.
- Customize message sounds.
- Manage blocked contacts.
- Choose Send & Receive addresses.
- Enable low-quality image mode if desired.
- Configure shared content settings.
- Set message history preferences.
- Enable focus mode integration.
- Adjust notification badges.
- Manage group messaging options.
- Configure Siri suggestions.
- Enable contact photos.
- Set automatic message cleanup.
- Manage spam filtering.
- Choose media download settings.
- Customize conversation alerts.
- Enable location sharing when needed.
- Personalize your messaging experience.
Mistakes to Avoid When Enabling iMessage
- Using an incorrect Apple ID.
- Ignoring software updates.
- Forgetting to connect to the internet.
- Disabling mobile data during activation.
- Using an inactive phone number.
- Entering incorrect login credentials.
- Forgetting to verify your number.
- Leaving VPN services enabled during setup.
- Ignoring activation delays.
- Skipping carrier updates.
- Using outdated iOS versions.
- Failing to restart the device.
- Removing the SIM card too early.
- Disabling Messages permissions.
- Using restricted network settings.
- Not checking Apple server status.
- Ignoring error notifications.
- Forgetting to enable Send & Receive options.
- Creating multiple conflicting Apple IDs.
- Giving up before activation completes.
FAQs
How do I enable iMessage on my iPhone?
Go to Settings, tap Messages, and switch iMessage on. Sign in with your Apple ID if prompted and wait for activation.
Why can’t I turn on iMessage?
Common reasons include internet issues, incorrect Apple ID credentials, outdated software, or carrier-related activation problems.
Does iMessage require Wi-Fi?
iMessage requires an internet connection. This can be through Wi-Fi or mobile data.
How long does iMessage activation take?
Most activations take a few minutes, but in some cases, it can take up to 24 hours.
How do I know if iMessage is working?
Messages sent through iMessage appear in blue bubbles, while standard SMS messages appear in green bubbles.
Can I use iMessage on iPad and Mac?
Yes. iMessage works on iPhone, iPad, Mac, and other compatible Apple devices when signed in with the same Apple ID.
Conclusion
Learning how to enable iMessage is one of the first and most important steps for getting the best experience from your Apple device. Whether you’re setting up a brand-new iPhone, activating an iPad, or syncing messages on a Mac, the process is usually simple and takes only a few minutes.
If activation problems occur, most issues can be solved by checking your internet connection, verifying your Apple ID, updating software, or resetting network settings. Once enabled, iMessage provides secure messaging, high-quality media sharing, seamless device synchronization, and many powerful communication features.
By following the steps and troubleshooting tips in this guide, you can quickly enable iMessage and enjoy everything Apple’s messaging platform has to offer.